
How to Choose the Best Bird Control Spikes?
Choosing Bird Control Spikes is not just a matter of picking the sharpest-looking product. The right option depends on the birds involved, the surface being protected, and the conditions at the installation site. A narrow ledge above a shop entrance has different needs from a broad roof edge exposed to wind and rain. Small details matter.
Start with the location. Measure the ledge, note its width, and check whether the surface is brick, metal, wood, or another material. Then compare spike width, material, and mounting method with the product’s installation guidance. Stainless steel may suit exposed areas, while UV-resistant plastic can work for some less demanding settings. But no material is perfect. Even durable products need inspection.
Bird Control Spikes should discourage perching without creating unnecessary hazards. Look for designs with blunt, evenly spaced projections, stable bases, and clear care instructions. Check that the product suits the target species; a system intended for small birds may not address larger ones. Installation quality matters, too. Loose adhesive, uneven spacing, or a dusty surface can weaken performance. It happens.
This guide explains the practical points to compare before buying, including coverage, durability, fitting, and upkeep. It also considers what spikes cannot solve. If food, shelter, or nesting spots remain nearby, birds may simply settle elsewhere. That possibility is easy to overlook. A careful choice begins with observing the site, not guessing from a product photo.
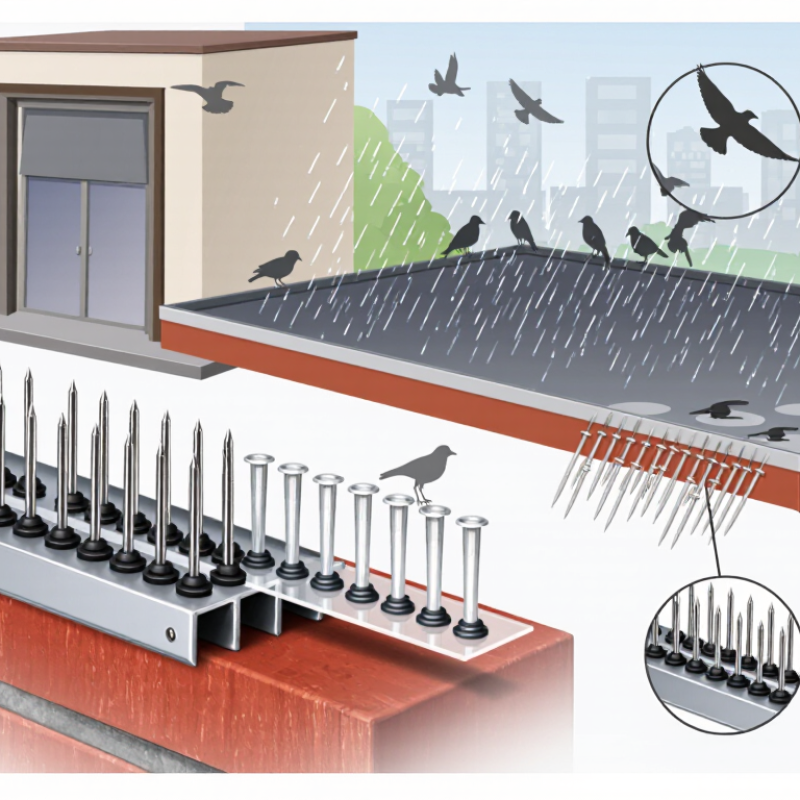
Identify the Bird Species and Areas Requiring Protection
Identify the bird before choosing a spike design. Pigeons often perch on broad ledges, while starlings and house sparrows may gather in tighter spaces around signs or roof edges. Look for droppings, feathers, nesting material, and the times birds arrive; a quick visual guess can be wrong. Cornell Lab’s eBird Status and Trends project models seasonal abundance for more than 2,000 bird species, showing why location and season matter when assessing activity. Use local observations to check which species visit your property and when.
Map each problem area separately. Measure ledge width, note corners and pipes, and check whether birds land on beams, gutters, or window sills. Bird control spikes generally suit narrow perching surfaces; they may not protect a wide roof or stop birds from moving to a nearby unprotected spot. Match the spike coverage to the actual landing area, and keep drainage paths clear. I have seen a small unprotected corner undermine an otherwise careful installation.
Tips: Take photos from a safe distance over several days. Record bird size, flock behavior, and landing spots. Compare your notes with Cornell Lab eBird Status and Trends maps, then select coverage for the species and surfaces involved. If identification remains uncertain, ask a qualified wildlife professional before installing anything.
Compare Spike Materials, Spacing, and Design
Choosing bird-control spikes starts with the surface and the birds that use it. Stainless steel resists corrosion and suits exposed ledges, though it can cost more and feel rigid on uneven stone. UV-stabilized plastic is lighter and easier to trim around corners. It may become brittle after years of strong sun, so check its condition regularly. Materials matter.
Spacing should discourage landing without leaving open pockets. Measure the ledge, then compare the spike row’s coverage with its width. Wider surfaces may need multiple rows, while narrow rails often need a compact design. Gaps near corners, signs, or pipe brackets can become favored perches. A small mock-up helps reveal these weak spots.
Look for a base that sits securely on the actual surface, not just one that looks sturdy in a product photo. Flexible bases can follow gentle curves; rigid sections may align more neatly on straight masonry. Blunt, evenly arranged points should make landing uncomfortable without presenting sharp, exposed hazards to people handling the installation. Fit matters more. Keep the surface clean before installation, and inspect the spikes after storms or cleaning. Even a well-chosen design can shift, collect debris, or leave a gap you missed.
| Spike Type | Material | Spacing and Design | Coverage and Fit | Best Suited For | Key Considerations |
|---|---|---|---|---|---|
| Metal spikes | Stainless-steel pins, usually fixed to a metal or UV-resistant plastic base. | Commonly arranged in several rows with a relatively dense pin pattern. Choose a pattern that leaves no comfortable landing space for the target birds. | Available in different base widths and modular lengths; measure the ledge and check the product’s stated coverage width before buying. | Exposed outdoor ledges, roof edges, signs, and other areas requiring a durable deterrent. | Strong and weather-resistant when made with suitable materials. Check that the base can be securely fixed to the surface and that cut ends are safely finished. |
| Polycarbonate spikes | UV-stabilized polycarbonate pins and base. | Often made as flexible strips with multiple rows of pins. Pin height and spacing vary by design; compare the product diagram with the size and behavior of the birds. | Lightweight strips can be trimmed or joined to follow straight or gently curved edges, subject to the product instructions. | Residential ledges, fences, and locations where a less visually prominent installation is preferred. | UV stabilization matters for long-term sun exposure. Confirm that the product is rated for the local weather and that the mounting method suits the surface. |
| Metal-pin spikes with a plastic base | Metal pins mounted on a plastic base, combining rigid pins with a lightweight mounting strip. | Usually offers a multi-row layout. Compare pin height, row count, and spacing rather than relying on the material description alone. | Modular sections are commonly available; select a base wide enough to cover the usable landing area. | Sites needing firm pins with a base that is easier to handle or attach than an all-metal strip. | Check both components: pin corrosion resistance and the base’s UV and temperature resistance. Use compatible fixings for the mounting surface. |
| Flexible or narrow-profile spikes | Typically a flexible plastic base with plastic or metal pins; construction differs by product. | Narrower bases are designed for restricted spaces. The pin pattern must still prevent landing; narrow strips may need careful placement or parallel rows on broad surfaces. | Useful for narrow rails, pipes, and architectural details, but measure the surface because a narrow strip may not cover a wide ledge. | Small, defined landing areas where a wider base will not fit. | Check attachment compatibility and make sure the strip cannot shift, lift, or leave gaps at joints and ends. |
| Wide-base, multi-row spikes | Usually available with stainless-steel pins, polycarbonate pins, or metal pins on a plastic base. | Multiple rows cover a broader landing zone. Use the manufacturer’s coverage dimensions to determine whether one strip or multiple parallel strips are needed. | Designed for wider parapets, roof ledges, and similar surfaces; coverage depends on the base width and installation layout. | Broad surfaces where birds could otherwise land beside a single narrow strip. | More coverage does not replace correct installation. Keep sections continuous and avoid untreated gaps around corners, joints, and nearby fixtures. |
Selection note: There is no universal pin-spacing standard across bird-spike products. Compare the actual dimensions shown by the supplier, consider the target species and available landing area, and follow local wildlife rules. Spikes should deter perching without trapping or injuring birds; install them securely and keep them maintained.
Measure the Site and Check Surface Compatibility
Measure the exact places where birds land, not just the full length of a roof edge. Use a tape measure, and record each separate ledge, sign, pipe, or beam. Note the usable depth too; a narrow sill may not accept a spike strip of standard width. Curves and corners need careful attention. Small details matter. Take clear photos and mark gaps, drains, and fixtures on a simple sketch. These can reveal sections that a quick measurement misses. Check where birds perch and leave droppings, but avoid assuming every empty section needs coverage. Even careful measurements can be off, so verify them before ordering.
Next, check what each surface is made of and whether it is sound, clean, and stable. Concrete, metal, wood, and roof membranes can require different fixing methods. A mounting method that holds on masonry may damage a thin panel or fail on a rough, dusty surface. Review the installation guidance for the spike system, and confirm that its attachment method suits the site. Consider rain, temperature changes, and access for cleaning. Keep drainage paths clear, and do not attach products to loose or fragile material. If the surface is uncertain, test a small, discreet area first or ask a qualified installer to assess it. It is easy to overlook one awkward corner; a second site check is worthwhile.
Assess Safety, Durability, and Maintenance Needs
When choosing bird control spikes, check how they manage risk as well as how well they deter landing. The tips should discourage perching without creating unnecessary injury hazards. Look for securely joined, smooth-edged components, and avoid designs with broken or exposed sharp parts. Consider who may access the area, including maintenance workers and children. Not every roof edge is easy to reach safely.
Durability depends on the site. Corrosion-resistant metal may suit exposed ledges, while UV-stable plastic can work in less demanding locations. Inspect the material and mounting points for rust, cracking, or loosened adhesive. A sturdy spike can still fail if its base lifts in wind or rain. Maintenance matters. Check the installation every few weeks at first, then after storms. Remove leaves, feathers, and nesting material carefully, and keep gutters and drainage paths clear. Wear suitable gloves, and do not reach beyond a secure working position. It is easy to focus on spike spacing and overlook cleanup access; that is a real trade-off. Choose a layout you can inspect without taking risky shortcuts.
Select the Right Spikes and Plan Their Installation
How to Choose the Best Bird Control Spikes?
Select spikes for the birds’ landing behavior and the surface shape, not appearance alone. Narrow ledges may need a compact profile; broad beams need wider coverage with no open landing strips. The Cornell Lab’s State of the Birds 2022 report estimates that North America has lost 3 billion birds since 1970. That context supports targeted, nonlethal exclusion rather than indiscriminate deterrence.
Measure each ledge, corner, and pipe before ordering. The FAA’s 2022 National Wildlife Strike Report recorded about 17,200 wildlife strikes, with birds accounting for over 97 percent. Airport data cannot predict building conditions, but they show why careful site assessment matters. Choose durable, weather-suitable materials, and check that the base fits the surface. Small gaps matter. Also keep drains, vents, and maintenance access clear.
Plan installation around the actual perch points. Clean and dry the surface, then use fasteners suited to masonry, metal, or wood. Avoid uneven runs that leave easy landing spots. Test the surface first, especially if old paint or brittle masonry is present. I would recheck the layout after the first heavy rain; adhesive performance can be less predictable than the product sheet suggests. Inspect periodically for loose sections, trapped debris, or new landing points.
How to Choose Bird Control Spikes
Typical adult body length can help you identify the birds using a ledge or roofline. It is only a starting point: choose spikes that cover the surface without gaps, check the product’s specified coverage width, and install them according to the manufacturer’s instructions.